I love the look of mitered squares, but find knitting each square a bit tedious; the stopping and starting makes it hard for me to get into a groove. This mosaic design creates a mitered square appearance without all the work. This scarf is knit using slipped stitches – an easy technique that creates textured, two-color results while knitting with only one color at a time. If you can knit a garter stitch scarf, you can knit this scarf.
Skills:
Cast on, knit, slip stitches purlwise, bind off.
Size:
7″ wide X 72″ long.
Standard Abbreviations:
BO – Bind off CC – Contrast color CO – Cast on K – Knit MC – Main color RS – Right side WS – Wrong side
Materials:
Worsted weight yarn in two contrasting colors – Approximately 170 yards (100 g) each MC and CC. Tested with Vanna’s Choice. 1 pair size 8 US (5 mm) needles or size you typically use to knit worsted weight.
Gauge:
19 stitches & 30 rows = 4″ in pattern stitch (knit every row) after blocking. However, gauge is not critical for this project.
General Notes – how to read the pattern chart:
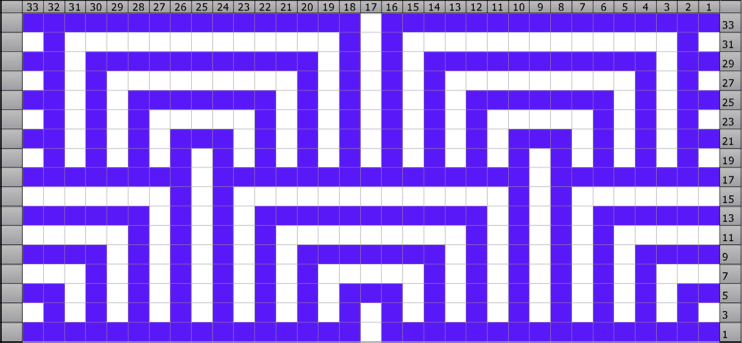
This pattern uses a mosaic chart. Each row of the chart represents 2 rows of knitting with the same color yarn. Each row of the chart is read first right to left for the RS (odd numbered) rows and then left to right for the WS rows. The first square of the row shows when to use MC (blue) or CC (white). When knitting a row with MC, knit the stitch represented by the blue squares and slip the stitch represented by the white squares purlwise with yarn in back on the RS and yarn in front on the WS. The term “front” means the side closest to you when knitting, and “back” means the side away from you when knitting. When knitting a row with CC, knit the stitch represented by the white square and slip the stitch represented by the blue square purlwise with the yarn in back on the RS and in front on the WS. You don’t really need to reference the chart for the WS rows, just knit the stitches that are in the same color as the working yarn and slip the others with the yarn in front. There is no need to cut the yarn between rows of MC and CC. Just carry the MC and CC yarns up the side.
Directions (see general notes to read chart correctly):
CO 33 stitches with CC. Work rows 1-34 of the Faux Mitered Mosaic Chart, starting at the bottom right of the chart (Row 1) with MC. Repeat Faux Mitered Mosaic Chart 15 more times – for a total of 16 times. BO in CC. Weave in ends, and steam block scarf to straighten. Blocking will greatly improve the appearance of mosaic designs.

Blue (dark) Squares – MC White Squares – CC
This design was inspired by the Pin Box Pattern presented in Barbara G Walker’s A Second Treasury of Knitting Patterns, 1998, Schoolhouse Press.
About the designer
Sarah’s job keeps her on the road more than she would like. She began knitting again in 2007 (having not knitted since college in the 80s!) as a way to bring some sanity back to her traveling. Her blog can be found at Verdigris Knits.

